Auto-Calibration
Auto-calibration is the recommended way to calibrate PiTrac cameras. It automatically determines focal lengths and camera angles through a 4-step web wizard - no tape measures, no manual JSON editing, no shell scripts. These measurements are used by PiTrac during operation to determine the location of the ball in real space relative to the unit.
What Auto-Calibration Does
Calculates automatically:
- Focal length for each camera (in pixels, typically 800-1200 for 6mm lens)
- Camera angles (X and Y tilt in degrees)
Writes to configuration:
- Updates
~/.pitrac/config/calibration_data.jsonwith results - Preserves these values across config resets
- No manual file editing required
Previous method (deprecated): Manual measurements, Excel spreadsheets, tape measures, angle calculations by hand. If you’re still doing that, stop. Use this instead.
Physical Setup
Before you can run auto-calibration in the web UI, you need a calibration rig to hold golf balls at known positions.
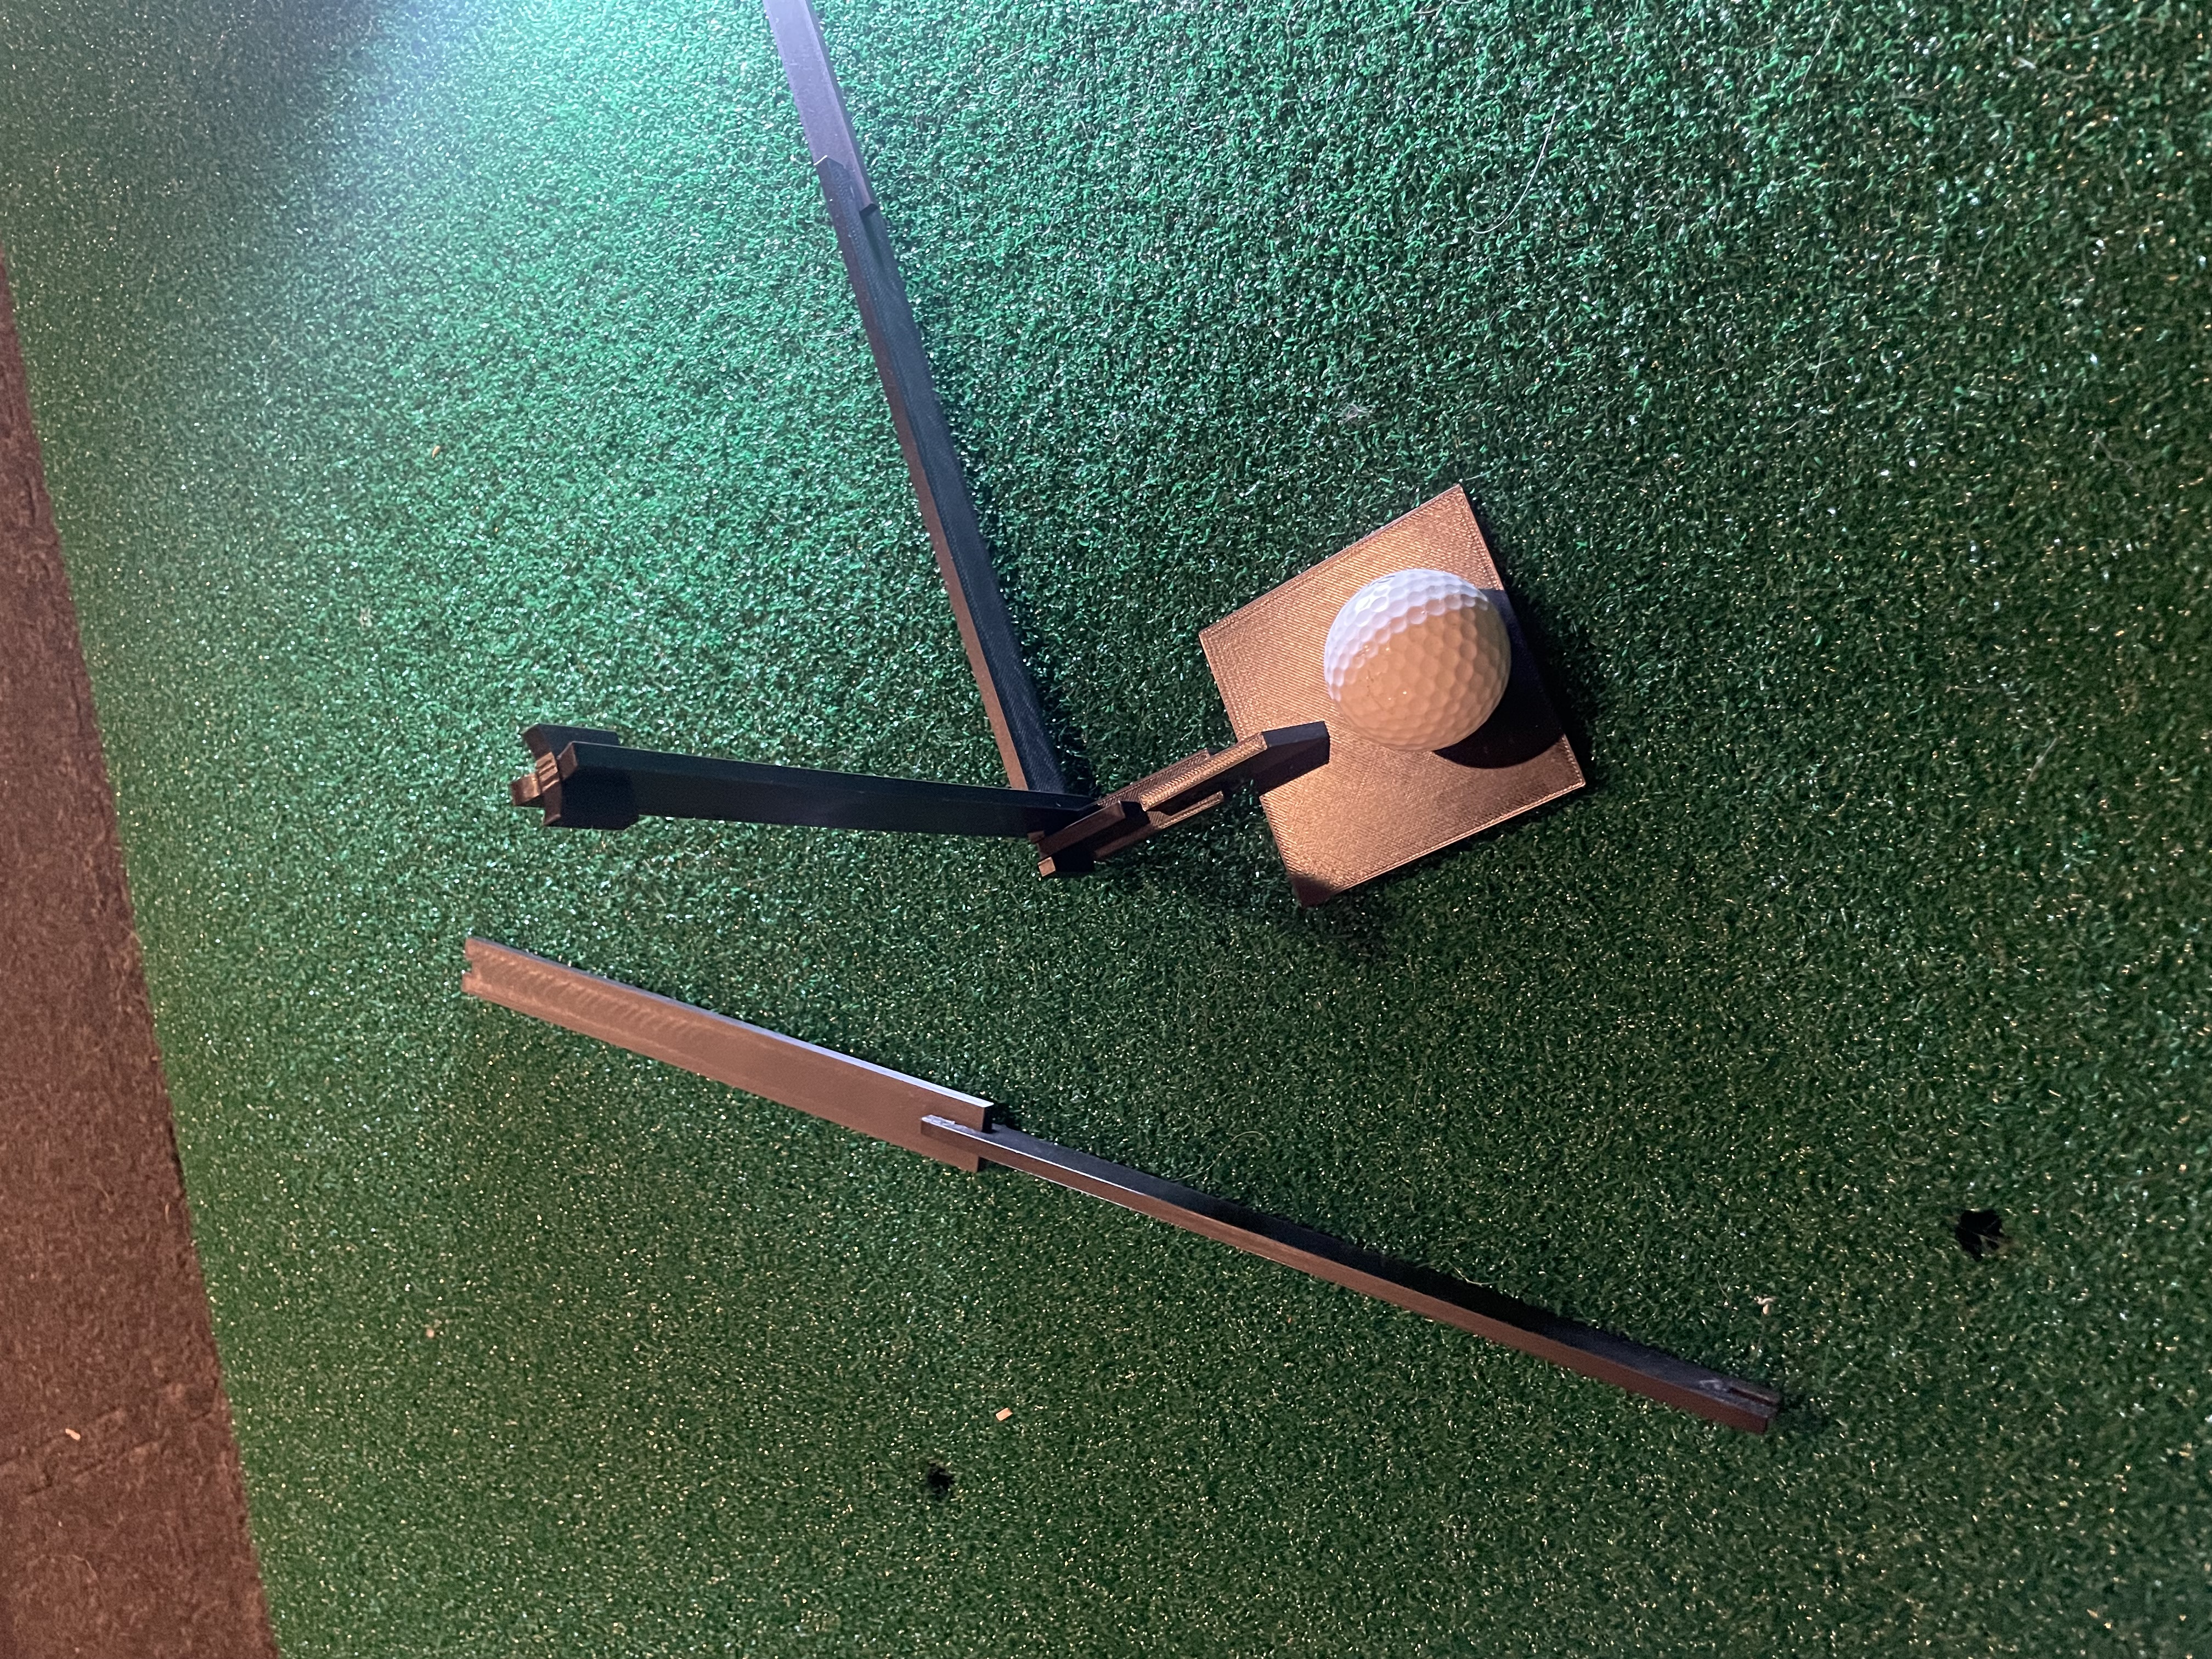
1. Print the Calibration Rig
Files: GitHub - Calibration Rig STL files
The rig works with both V1.0, 2.0, and StefanF’s 3.0 enclosures, though V1 is not as well-supported and may need custom measurements (ask on Discord). Only difference is the measurement values you’ll configure. Because V3.0 is still under development, these values may need to be updated from time to time.
Print Settings:
- Material: PETG preferred (less warping), PLA works fine
- Infill: 15% standard
- Supports: Only on the Ball 1 floor mount (green area in STL)
- Filament: < 100 grams
Assembly:
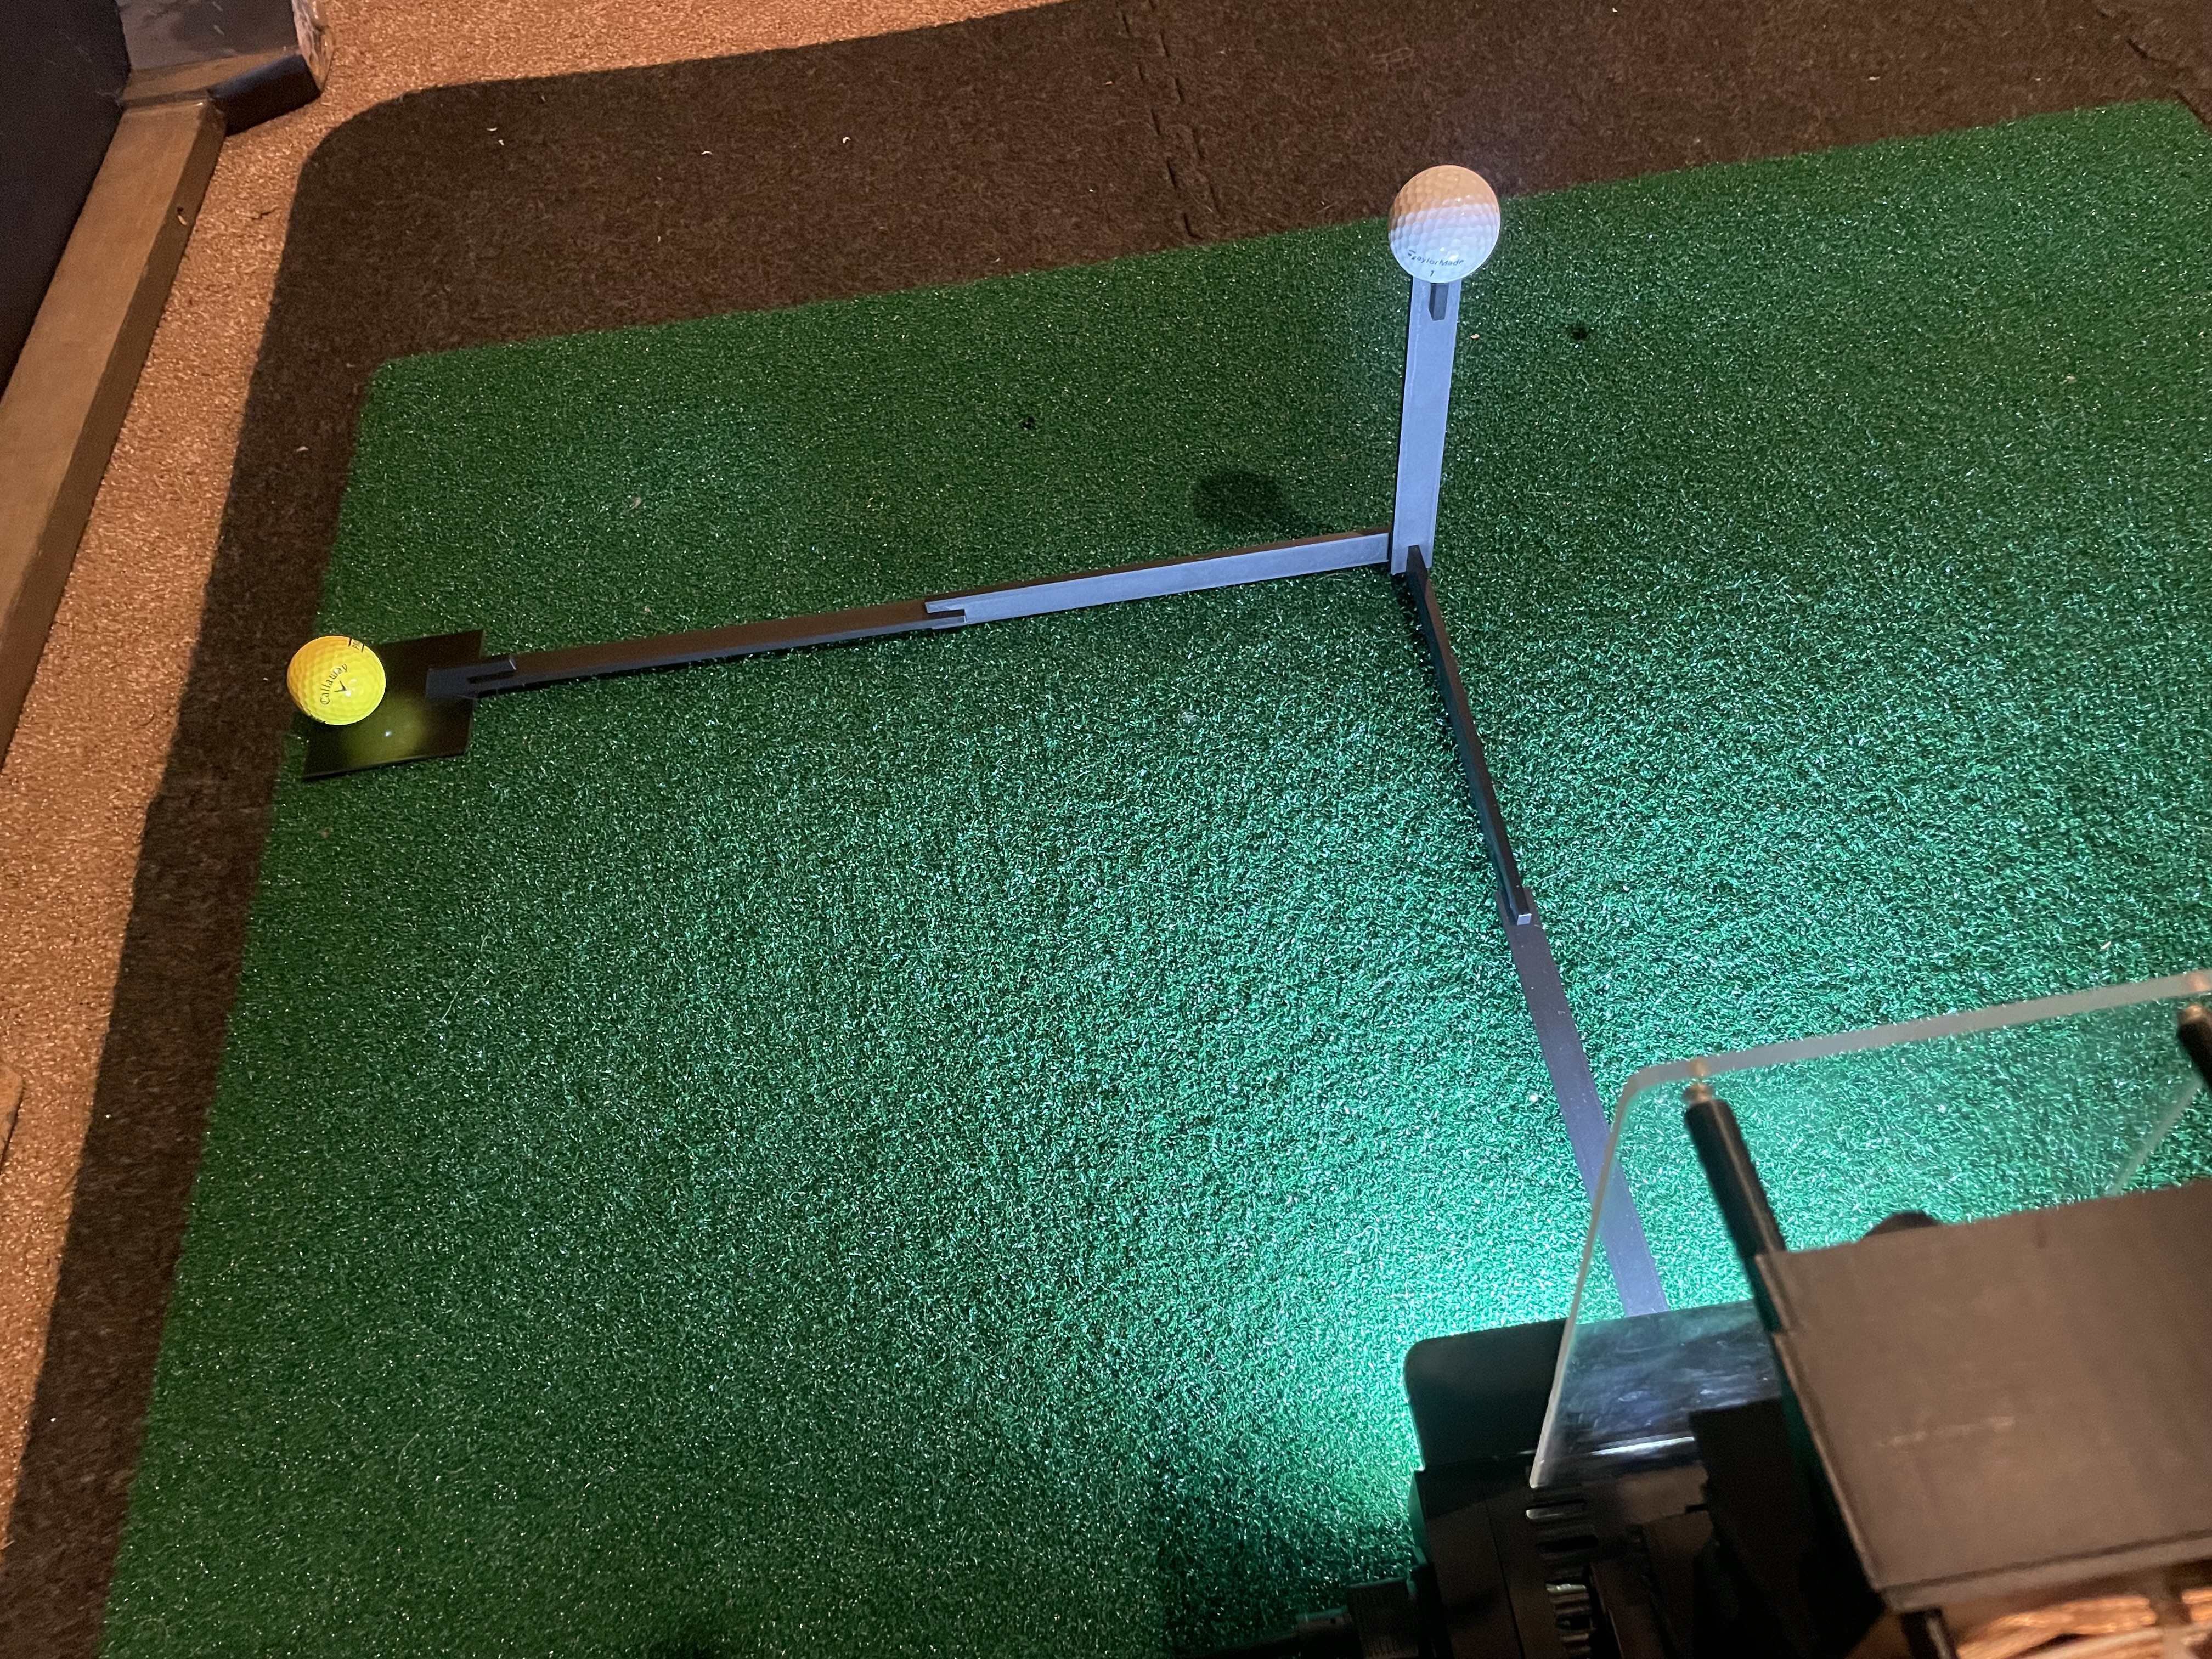
- The assembly process will depend on whether your PiTrac has both cameras pointed straight forward, or if Camera 1 (the “Teed Ball Camera”) is angled over to the side to accomodate faster shots.
- The skewed version looks like this:
- Skewed Camera Calibration Rig
- The cameras-straight-out version replaces the long arm with two short pieces and looks like this:
- Straight-out Camera Calibration Rig
- Push pieces together snugly (can be tight - that’s normal)
- Make sure connections are fully seated for accurate dimensions
- Ball 1 (right-most) sits on floor, Ball 2 (mid-air). NOTE - only place one ball at a time during calibration or the system will get confused.
2. Position the Rig
Version 2.0 and 3.0 Enclosure:
- Insert the square tab into the square hole in bottom front of enclosure. You may need to nudge the LED light strip to get at the hole.
- Check that rig is square to the enclosure and that the arm for the ball on the floor is 90° to the other leg. Also ensure the ball in the air is held straight up.
Version 1.0 Enclosure (Deprecated):
- Center tab underneath lowest camera
- Place tab on diagonal part of enclosure
- Align end edge of rear part with outside of lower enclosure section
Use a carpenter’s square or similar to ensure rig is perpendicular to the enclosure. Precision here improves calibration accuracy.
3. Aim the Cameras
Camera 1 (Tee Camera):
- Point directly at Ball 1 (on floor). For straight-out camera, then move the camera slightly so it is still aimed down, but is aimed straight out along the leg of the rig that attachs to the PiTrac.
- Doesn’t need to be perfect - calibration figures out exact angle. Just get it close.
Camera 2 (Flight Camera):
- Point straight out from monitor
- Aim slightly below Ball 2 (mid-air ball)
- Again, close is fine
Tighten camera mount screws once aimed. Cameras moving after calibration = need to recalibrate.
4. Configure Ball Positions
The calibration wizard needs to know where the balls are relative to the cameras. These measurements (for each of the “standard” rig setups) are already store in the system settings for each camera, and can be selected (or modified) in the Configuration page under “Calibration” settings.
Use the UI to select one of the three calibration rig options:
For Version 1.0 Enclosure (with “skewed” rig where the teed ball is out to one side):
kAutoCalibrationBallPositionFromCamera1Meters: [-0.525, -0.275, 0.45]
kAutoCalibrationBallPositionFromCamera2Meters: [0.0, 0.095, 0.435]
For Version 2.0 Enclosure (with skewed rig):
kAutoCalibrationBallPositionFromCamera1Meters: [-0.504, -0.234, 0.491]
kAutoCalibrationBallPositionFromCamera2Meters: [0.0, 0.088, 0.466]
For Version 3.0 Enclosure (with skewed rig):
kAutoCalibrationBallPositionFromCamera1Meters: [-0.521, -0.243, 0.481]
kAutoCalibrationBallPositionFromCamera2Meters: [0.0, 0.109, 0.472]
Coordinate system:
- X: Positive = right (from camera view)
- Y: Positive = up
- Z: Positive = outward (away from camera)
- Units: Meters
If you built your own rig, measure from camera lens center to ball center and enter those values.
These settings are in the web Configuration page - you don’t need to edit JSON files manually.
Running Auto-Calibration (Web UI)
Step 1: Open Calibration Wizard
- Select the type of calibration rig you will be using (depending on the camera arrangement and enclosure version) in Configuration → Calibration → kCalibrationRigType: Calibration Rig Selection
- Navigate to the PiTrac web dashboard (usually
http://raspberrypi.local:8080) where raspberrypi is the name of your pi on the network, e.g. ‘http://192.168.0.20.local:8080’. - Click menu (3 dots) → Calibration
- Select which camera(s) to calibrate:
- Camera 1 - Recommended starting point (~30 seconds)
- Camera 2 - Do this second (~2 minutes, yes really)
- Both - Only after you’ve done each individually
Calibrate Camera 1 first. It’s faster and gives you immediate feedback if something’s wrong.
Click Next.
Step 2: Verify Ball Placement
This step confirms PiTrac can actually see the ball before trying to calibrate.
For each camera:
- Click Check Ball Location
- Green checkmark = Ball found at (X, Y) pixel coordinates
- Red X = Ball not detected
- Click Capture Still Image
- Shows what camera sees (not quite finished yet)
- Ball should be visible and roughly centered
- Focus should be good (twist M12 lens if not)
If ball detection fails:
- Check the images that the process captures (usually at ~/LM_Shares/Images)
- Check the latest log files for errors (~/.pitrac/logs)
-
- Check lighting (turn on strobes, adjust camera gain in Configuration)
- Verify ball is actually on the rig
- Make sure camera is aimed at ball
- Check focus
Once both buttons show success, click Next.
Step 3: Run Calibration
Pick calibration method:
Auto Calibration (Recommended)
- Fully automatic
- Click “Start Auto Calibration”
- Watch progress bar
- Wait for completion
Manual Calibration (Advanced)
- For troubleshooting when auto fails
- Same process but longer timeout (3 minutes vs 30-120 seconds)
- Rarely needed
What happens during calibration:
Camera 1 (~30 seconds):
- Captures 10 images of the ball (configurable)
- Detects ball center in each image using Hough Circle Transform
- Calculates focal length from:
f = (distance × sensor_width × (2 × radius_px / resolution_x)) / (2 × ball_radius_m) - Averages focal lengths across all successful samples
- Validates result (focal length must be 2.0-50.0mm, radius 0-10k pixels)
- Computes camera X and Y angles using final focal length
- Sends results to web server via HTTP API
- Updates configuration files
Camera 2 (~90-120 seconds):
- Same algorithm as Camera 1
- Takes longer due to two-process workflow in single-Pi mode:
- Background process captures images from Camera 2
- Foreground process performs calibration
- Background must initialize before foreground starts (adds ~30 seconds)
Completion Detection: The system uses a hybrid approach to detect when calibration finishes:
- API Callbacks (Primary) - C++ binary sends HTTP PUT requests when successful:
PUT /api/config/gs_config.cameras.kCamera1FocalLength(focal length value)PUT /api/config/gs_config.cameras.kCamera1Angles(X, Y angles array)- Both must be received for success
- Process Exit (Secondary) - Monitors C++ process exit code
- Code 0 = potential success (but may have failed internally)
- Non-zero = definite failure
- Output Parsing (Validation) - Checks for failure strings in output:
- “Failed to AutoCalibrateCamera”
- “ONNX detection failed - no balls found”
- “GetBall() failed to get a ball”
- “Could not DetermineFocalLengthForAutoCalibration”
- Timeout (Safety Net)
- Camera 1: 30 seconds
- Camera 2: 120 seconds
- Prevents hanging forever if process stalls
Progress Indicators:
- API Callbacks Received - Best outcome, all data received
- Process Exit - Process finished but may not have sent API callbacks
- Timeout - Process didn’t complete in time, check logs
Don’t:
- Move the ball
- Move the cameras
- Close the browser
- Stop PiTrac while calibrating
Step 4: Review Results
You’ll see results for each camera:
Status: Success or Failed
Completion Method: How calibration finished
- “api” - API callbacks received (best)
- “process” - Process exited cleanly
- “timeout” - Took too long (check logs)
Focal Length: Number in pixels (e.g., “1025.347”)
- Typical range for 6mm lens: 800-1200
- If way outside this range, something’s wrong
Camera Angles: [X_angle, Y_angle] in degrees (e.g., “[12.45, -6.78]”)
- X angle: Horizontal tilt
- Y angle: Vertical tilt
- Typical range: -20° to +20°
What to do:
- Success? Click “Return to Dashboard” and test it out
- Failed? Check troubleshooting section below
Verification
After calibration, verify it worked:
Ball Location Check
From web UI (Testing Tools):
- Leave ball on rig
- Navigate to Testing Tools
- Click “Check Ball Location” for Camera 1
Expected: Ball position in 3D should match your configured calibration position (within ~10mm)
Example:
- Configured: [-0.525, -0.275, 0.45] meters
- Detected: [-0.523, -0.271, 0.448] meters
- Difference: ~7mm - Good!
If detected position is way off (>50mm difference), calibration likely failed even if it said success.
Test Shots
Hit some balls and check if speeds and angles look reasonable:
- Driver swing: 80-120 mph ball speed
- 7-iron swing: 60-90 mph ball speed
- Launch angles: 5-20° depending on club
If you’re getting 300 mph or 5 mph, calibration is wrong. Recalibrate.
Troubleshooting
Ball Not Detected in Step 2
Lighting Issues:
- Turn on strobes (you should hear them click)
- Increase camera gain in Configuration → Cameras → kCamera1Gain (try 8-12)
- Make sure room isn’t too bright (IR strobes work better in darker rooms)
Focus Issues:
- Twist M12 lens focus ring
- Capture still images to check focus
- Ball should have sharp edges, not blurry
Positioning Issues:
- Verify ball is actually on rig
- Check camera is aimed at ball
- Make sure nothing is blocking camera view
Calibration Times Out
Camera 1 (should take ~30 seconds):
- Ball moved during calibration? Try again, keep it still
- Camera type set wrong? Check Configuration → Cameras → Auto Detect
- Check logs (Logging page) for errors
Camera 2 (should take 90-120 seconds):
- This is normal. Camera 2 legitimately takes 2 minutes. Be patient.
- Background process needs time to initialize and capture images
- If it goes past 2 minutes, check logs for errors
Both Cameras:
- System overloaded? Check
topon Pi - CPU should not be at 100% - Try manual calibration mode (longer timeout, may succeed)
Results Look Wrong
Focal length way off (< 800 or > 1200 for 6mm lens):
- Wrong lens type configured? Check Configuration → Cameras → Lens Choice
- Measured ball positions wrong? Verify rig measurements
- Ball detection failing? Check captured images in Testing Tools
Angles look weird (> 30° off from expected):
- Cameras moved during calibration
- Rig not square to enclosure
- Wrong enclosure version measurements (V1.0 vs V2.0)
Speed readings wrong after calibration:
- Ball position measurements incorrect
- Try recalibrating with verified measurements
- Check if ball moved between calibration attempts
Calibration Succeeds But Doesn’t Apply
Check:
- Calibration data should be in
~/.pitrac/config/calibration_data.json - Restart PiTrac LM (Stop/Start in web UI)
- Configuration → show focal length/angles - should match calibration results
If still using old values:
- User settings may be overriding calibration data
- Check Configuration → Show Diff to see what’s overridden
- Remove camera angle/focal length entries from user settings if present
Configuration Files
Auto-calibration writes to these locations:
Calibration Results: ~/.pitrac/config/calibration_data.json
{
  "gs_config": {
    "cameras": {
      "kCamera1FocalLength": 1025.347,
      "kCamera1Angles": [12.45, -6.78],
      "kCamera2FocalLength": 1050.123,
      "kCamera2Angles": [8.7, -3.1]
    }
  }
}
Backups: Old config backed up to:
~/.pitrac/config/calibration_data.json.backup.<timestamp>
Runtime Config: Results merged into:
~/.pitrac/config/generated_golf_sim_config.json(what C++ binary reads)
You never need to edit these manually. The web UI handles everything.
Advanced Topics
Number of Samples
Default: 10 images per camera
Adjust: Configuration → Calibration → kNumberPicturesForFocalLengthAverage
Trade-off:
- More samples = more accurate but slower
- Fewer samples = faster but may be less accurate
- 10 is a good balance
Custom Calibration Rigs
If you built your own rig:
- Measure from camera lens center to ball center (X, Y, Z in meters)
- Enter in Configuration → Calibration:
kAutoCalibrationBallPositionFromCamera1MeterskAutoCalibrationBallPositionFromCamera2Meters
- Run calibration wizard
Measurement tips:
- Use CAD software (FreeCAD, Fusion 360) for precision
- Measure to center of ball, not edge
- Measure from lens center, not camera front
- Use meters, not inches or millimeters
Lens Distortion
Auto-calibration handles minor lens distortion automatically. For severe distortion (fisheye lenses), you may need additional undistortion steps.
Current calibration assumes reasonable lens quality. The 6mm M12 lenses that come with cameras work fine.
When to Recalibrate
Required:
- First time setup
- After moving cameras
- After changing lenses
- After dropping/bumping enclosure
Not required:
- Every time you use PiTrac
- After adjusting camera gain
- After tweaking ball detection settings
- After software updates
Calibration data persists across reboots and config changes. Don’t recalibrate unless you have a reason.
Next Steps
- Calibrate Camera 1 - Takes 30 seconds
- Calibrate Camera 2 - Takes 2 minutes
- Verify results - Check ball location matches expected position
- Test shots - Hit some balls, verify speeds look reasonable
- Fine-tune - Adjust gain, search center, etc. as needed
Good calibration is the foundation of accurate ball tracking. Take your time with the physical setup - it’s worth it.