Using PiTrac
So you’ve got PiTrac built and the software installed! Follow this guide to get going and start smacking some golf balls!!
Web Interface
The PiTrac web interface can be reached from {PI-IP}:8080
If for some reason it’s not found the first two things to check would be:
- Is the PiTrac web service running?
- You can verify by running
pitrac web statusand start it withpitrac web start
- You can verify by running
- Are you visiting the right address?
- You can verify the IP address on the pi with
ifconfigand look for your configured interface with a local IP address - If you are using the desktop enviornment on the Pi - use
localhostor127.0.0.1as the IP - Always use
http://. We can look to supporthttpsin the future, but it adds a bit of complexity for the end user so for now we left it out.
- You can verify the IP address on the pi with
Homepage
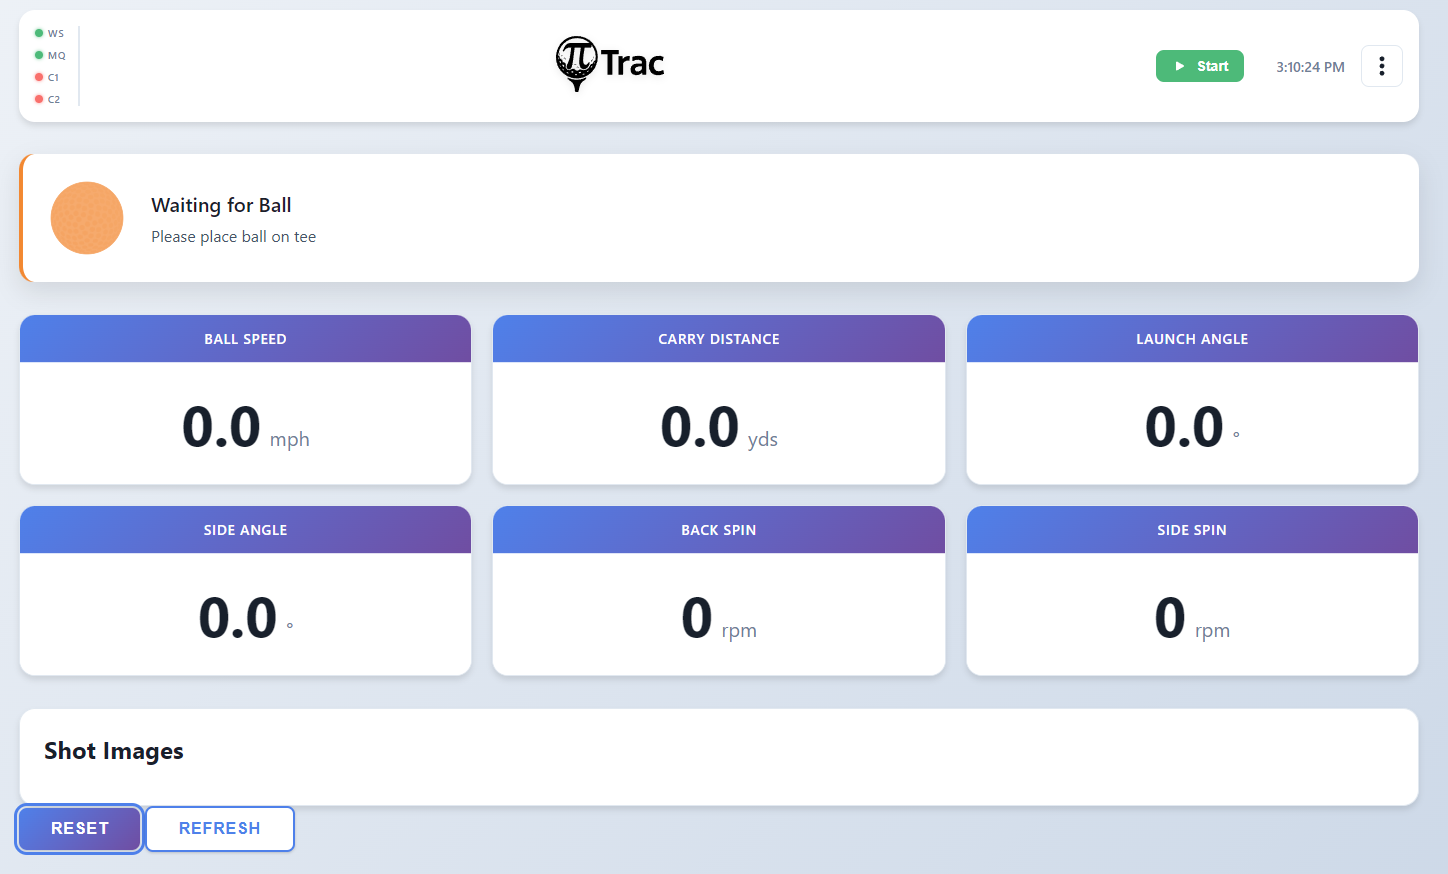
When you vist the base url this is the view you will be met with. Here is where you will Start/Stop the PiTrac LM, see your shot images, and see your shot stats.
Looking at the header you will see the status indicators. 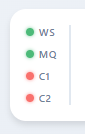 These give you a way to see what is running at a glance. They show you:
- ActiveMQ Status
- Cam1 Process Status
- Cam2 Process Status
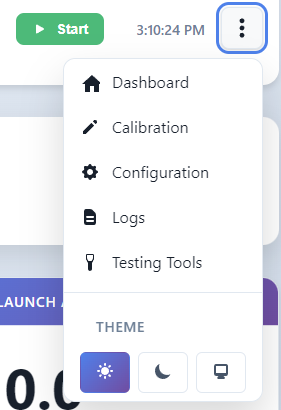
In the top right hand corner you’ll see the button to start the LM, and a button with 3 dots. This is the popout menu that:
- Toggles dark mode
- Opens Configuration
- Opens Calibration
- Opens Testing Tools
- Opens Logging
Configuration
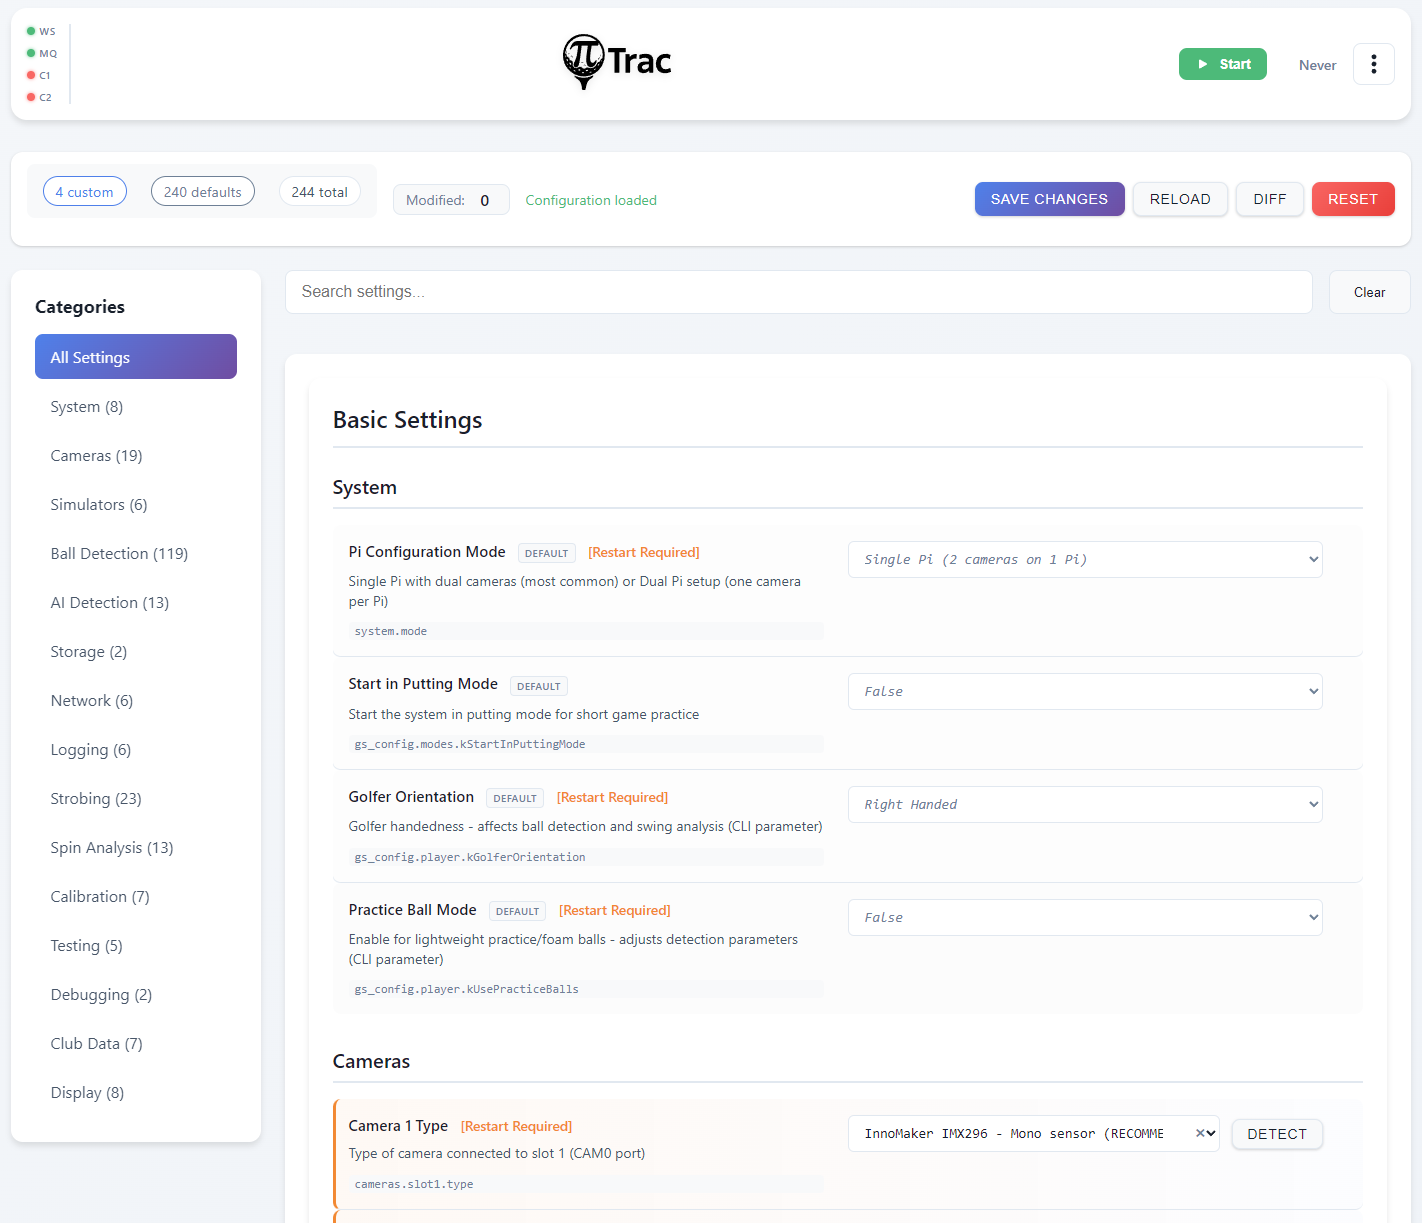
This is the new location for all PiTrac configuration! No more editing 1000+ line JSON files!
First-Time Setup
When you first open Configuration, there are a few critical settings you need to set before anything will work:
Camera Hardware
Camera 1 Type and Camera 2 Type - This is the most important setting. PiTrac needs to know what cameras you’re using:
- Click “Auto Detect” and PiTrac will try to identify your cameras
- If that doesn’t work (or picks the wrong ones), manually select from the dropdown:
- InnoMaker CAM-MIPI327RAW - Recommended camera
- Pi Global Shutter Camera - Also supported
- Other options for older hardware
Lens Choice - Tell PiTrac what lenses you have:
- 6mm M12 - Standard wide-angle lens (most common)
- 4mm M12 - Wider field of view
- 8mm M12 - Narrower field of view
After changing camera or lens settings, you’ll need to stop and restart PiTrac for the changes to take effect.
System Mode
Single Pi Mode (default) - Both cameras connected to one Raspberry Pi. This is what most people use.
Dual Pi Mode - One camera per Pi, connected over network. Advanced setup, requires additional configuration.
Golfer Orientation
Right-Handed (default) - For right-handed golfers Left-Handed - For left-handed golfers (experimental, may need tweaking)
The Interface
Categories (left sidebar) - Settings are organized into groups:
- Basic Settings - The 30-ish settings you’ll actually touch
- Cameras - Camera hardware, gains, exposure
- Ball Detection - How PiTrac finds the ball
- Simulators - E6, GSPro, TruGolf connection settings
- …and 10 more categories with 250+ advanced settings
Search Bar (top) - Type part of a setting name to find it instantly. Way faster than clicking through categories.
Modified Indicator - Shows how many settings you’ve changed but haven’t saved yet.
Common Settings You’ll Actually Change
Camera Gains
Path: Cameras → kCamera1Gain / kCamera2Gain Range: 0.5 to 16.0 Default: 6.0
Too dark? Increase gain (try 8-12). Too bright or noisy? Decrease gain (try 3-6).
Better lighting is always better than cranking gain. Higher gain = more noise.
Simulator Connection
Path: Simulators → E6/GSPro sections
You’ll need the IP address of the computer running your simulator software:
- E6 Connect Address - IP of PC running E6 (e.g., 192.168.1.100)
- E6 Connect Port - Usually 2483
- GSPro Host Address - IP of PC running GSPro
- GSPro Port - Usually 921
Use ifconfig (Mac/Linux) or ipconfig (Windows) on your simulator PC to find its IP.
Ball Search Area
Path: Ball Detection → kSearchCenterX / kSearchCenterY
These tell PiTrac where to look for the ball. If detection is slow or picks up the wrong objects, you might need to adjust these.
Default is usually fine, but if you move your cameras you’ll want to update this. Use Testing Tools → Capture Still Image to see where the ball actually is in the frame, then set the search center to those pixel coordinates.
Saving Changes
- Edit whatever settings you need
- Click “Save Changes” at the top right
- If a setting requires restart, you’ll see a warning
- Stop and start PiTrac to apply restart-required changes
Most settings apply immediately. Camera hardware changes and a few others need a restart.
Advanced Features
Show Diff - See what you’ve changed from the default values. Useful before resetting everything.
Import/Export - Save your configuration as a backup or share it. Configurations are just JSON files.
Reset to Defaults - Puts everything back to factory settings. Your calibration data is safe though - it’s stored separately and won’t be lost.
What You Don’t Need to Touch
PiTrac has 283 total settings, but you only need to worry about maybe 30 of them. The rest are for fine-tuning ball detection algorithms, adjusting strobe timing, debugging, testing, etc.
Stick to the Basic category unless something’s not working and you’re troubleshooting. The defaults are there for a reason.
Configuration Files (If You’re Curious)
PiTrac uses a three-tier configuration system:
- Defaults - Built into
/usr/lib/pitrac/web-server/configurations.json(283 settings with metadata) - Calibration data - Auto-generated results in
~/.pitrac/config/calibration_data.json - Your overrides - Manual changes in
~/.pitrac/config/user_settings.json
When you save changes through the web UI:
- Your overrides go to
user_settings.json(sparse file, only what you changed) - Calibration results go to
calibration_data.json(preserved across resets) - System generates
generated_golf_sim_config.jsonby merging all three layers
The generated_golf_sim_config.json file is what the pitrac_lm binary actually reads at runtime.
The layers merge in priority order: your overrides > calibration > defaults. Your changes always win.
You can edit the JSON files directly if you want, but the web UI is way easier and validates your input.
Calibration

Calibration is how PiTrac learns about your camera setup - where the cameras are positioned, what angle they’re at, and the characteristics of your lenses. Without calibration, PiTrac can’t accurately convert what it sees in 2D images into real 3D ball flight data.
Before You Start
Make sure you have:
- Cameras connected and powered
- Ball on the tee in your normal address position
- Good lighting (strobes working)
- Camera types set correctly in Configuration
- PiTrac LM stopped (calibration will start it for you)
The 4-Step Process
Calibration is a wizard that walks you through everything. Just follow along.
Step 1: Setup
Pick which camera to calibrate:
- Camera 1 (Tee Camera) - ALWAYS START HERE. Takes about 30 seconds.
- Camera 2 (Flight Camera) - Do this second. Takes 90-120 seconds.
- Both - Only after you’ve done each individually and know it works
Why Camera 1 first? It’s faster and gives you immediate feedback on whether your setup is working. Camera 2 takes longer due to some technical reasons (background process stuff in single-Pi mode).
Click “Next” when ready.
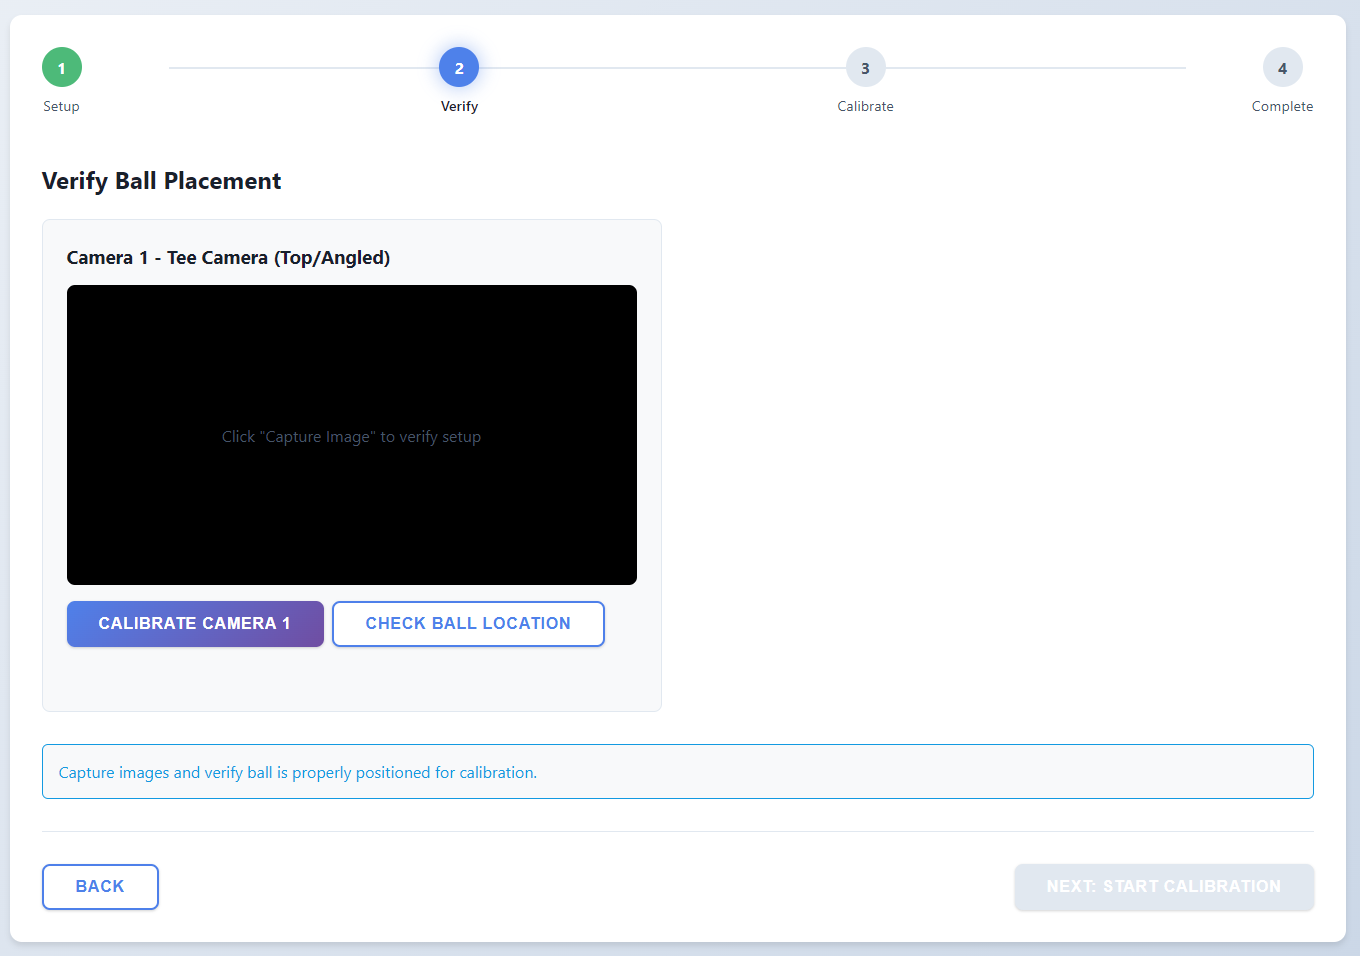
Step 2: Verify Ball Placement
This step makes sure PiTrac can actually see the ball before trying to calibrate.
For each camera:
Check Ball Location - Runs a quick ball detection test
- Green checkmark = Ball found, coordinates shown
- Red X = No ball detected
If ball detection fails:
- Make sure ball is on the tee
- Check lighting (too dark? too bright?)
- Verify camera is aimed at the ball
- Try adjusting camera gain in Configuration
Capture Still Image - Takes a snapshot so you can visually verify
- Image appears with detection overlay
- Ball should be clearly visible and centered
- Green circle should match the ball
Once both buttons show success, click “Next”.
Step 3: Run Calibration
Pick your calibration method:
Auto Calibration (Recommended)
- Fully automatic
- Usually more accurate
- Just click Start and wait
Manual Calibration (Advanced)
- For when auto fails or you want fine control
- Requires understanding camera geometry
- Not for first-timers
During calibration:
- Don’t move the ball
- Don’t move the cameras
- Don’t close the browser
- Watch the progress bar and logs
What’s happening: PiTrac captures multiple images of the ball, detects the ball center in each one, then does math to figure out the camera’s focal length, angles, and position. This takes:
- Camera 1: ~30 seconds
- Camera 2: ~90-120 seconds (yes, really - single-Pi mode requires a background process)
Completion indicators:
- “API Callback” = Best result, calibration called back successfully
- “Process Exit” = Also good, process finished cleanly
- “Timeout” = Calibration didn’t complete in time, check logs
Step 4: Results
You’ll see results for each camera:
Status: Success or Failed
Focal Length: Number in pixels (e.g., “835.2”). This is a camera/lens characteristic.
Camera Angles: Two numbers in degrees (e.g., “[12.5, -3.2]”). This is the camera’s orientation in 3D space.
What to do next:
- Success? Click “Return to Dashboard” and start hitting balls
- Numbers look weird? Try calibrating again
- Still failing? Check Troubleshooting section
When to Recalibrate
You need to run calibration:
- First time setup (obviously)
- After moving cameras
- After changing lenses
- If shots are consistently reading wrong
- After crashing into the camera with a club (we’ve all done it)
You DON’T need to recalibrate:
- Every time you use PiTrac
- After adjusting camera gain
- After tweaking ball detection settings
- Just because you feel like it
Calibration results are saved to ~/.pitrac/config/calibration_data.json and persist across reboots. Even if you reset configuration to defaults, calibration data stays safe. The calibration tools and checkerboard images are stored in ~/.pitrac/calibration/, but the actual calibration data (focal lengths, angles, matrices) lives in the config directory.
Troubleshooting Calibration
Ball not detected in Step 2:
- Improve lighting
- Adjust camera gain (Configuration → Cameras)
- Make sure ball is in frame
- Check camera focus
Calibration times out:
- Camera 2 can take 2+ minutes, be patient
- Check logs for errors
- Try manual calibration mode
- Verify cameras are working (use Testing Tools)
Results look wrong (speed/angles way off):
- Ball moved during calibration? Try again.
- Wrong camera type selected? Fix in Configuration and recalibrate.
- Cameras loose or wobbly? Secure them and recalibrate.
- Physical setup changed? Recalibrate.
Camera 2 always times out:
- Check if you actually need Camera 2 - some setups work with just Camera 1
- Try on a dual-Pi setup if you have one (faster)
- Check system resources (Pi not overloaded?)
If calibration keeps failing, come find us on Discord. Include your log output and we’ll figure it out.
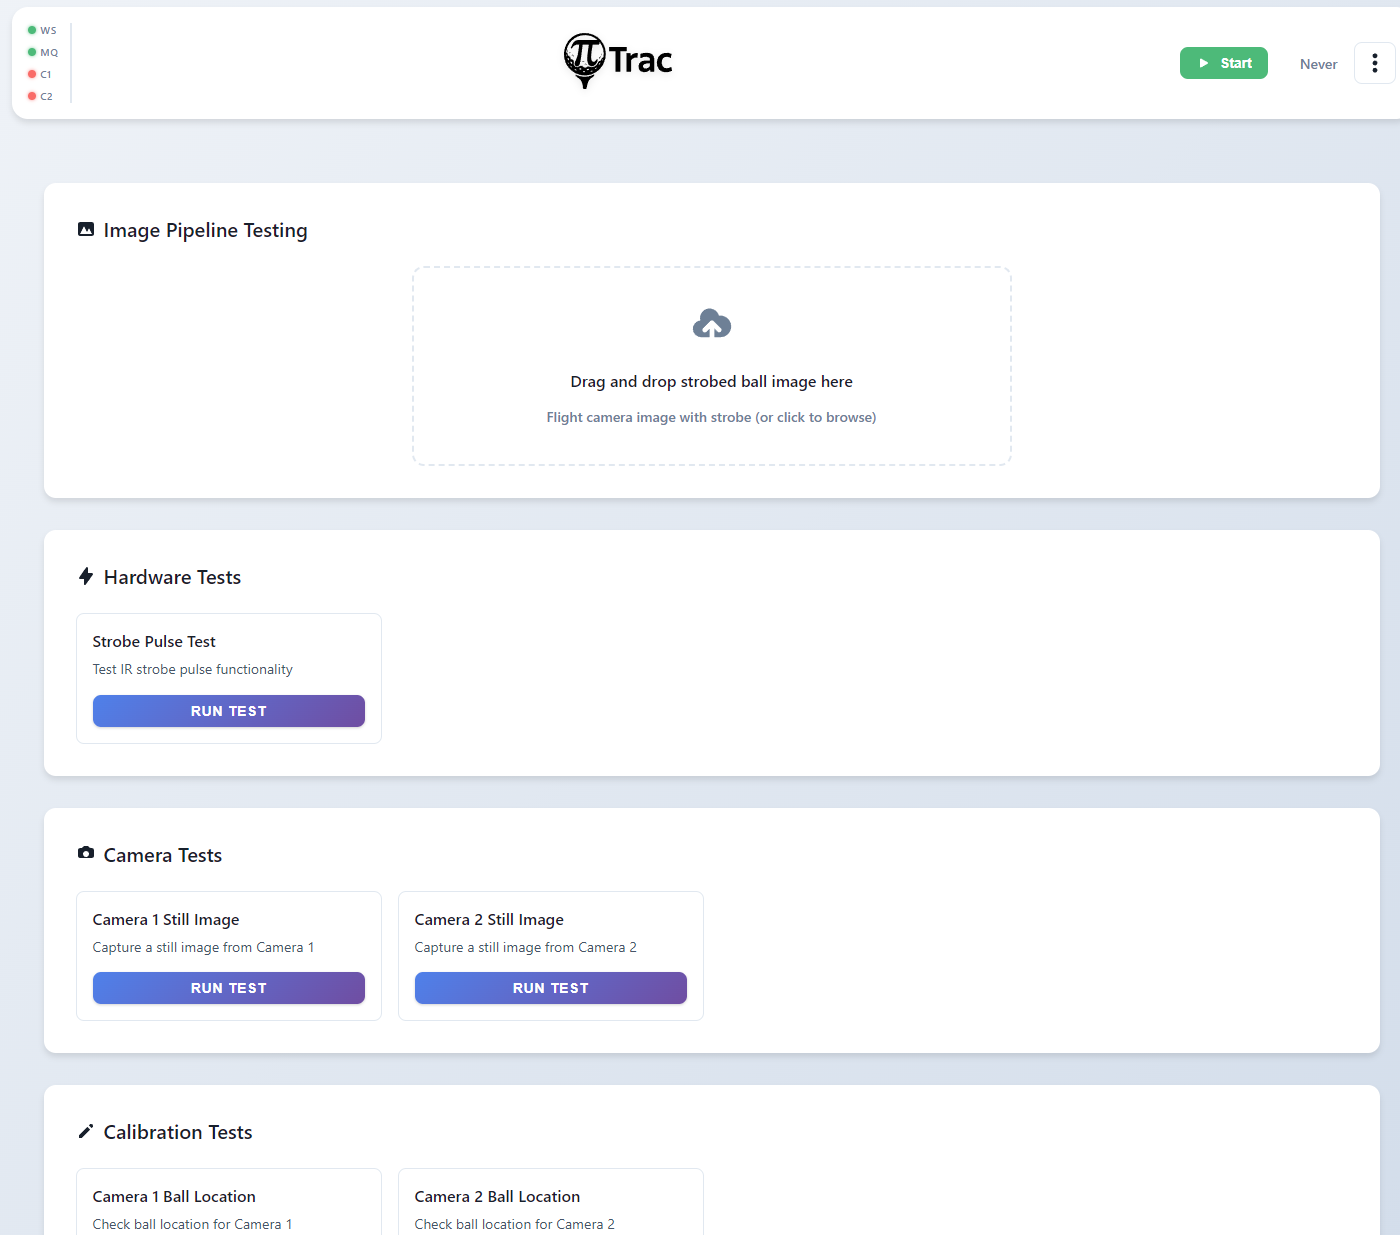
Debugging Tools
We have two pages dedicated to the debugging of PiTrac.
- Logging
- Testing
Logging will allow you to see the logs for Cam1, Cam2, Web-Server, and ActiveMQ. You can pause/resume streaming, clear the display, and download logs for offline analysis.
The testing tools will allow you to verify the shot-processing pipeline, do strobe tests, and more!